I can't believe I didn't post anything about this when it happened. After all the work last September, I didn't get to ride the dragon trike to a BTW benefit I was involved with, but I did tow it there and it won Best of Show *and* Best Engine.
Thanks to Bondo Joe Lane for both the prize winning paint and this picture of me and my goofy grin. :)
Monday, February 14, 2011
Wednesday, November 24, 2010
Uh oh, I've got..... HAPPY CLUTCH!
With my apologies to Steve Martin...
I had to skip an evening, but we were released from work a couple hours early, so I have had time to get a bite to eat (skipped lunch today), get home, change clothes, finishe assembling the trike, test ride and adjust the clutch, all by about the time I would normally be getting home.
The new clutch works very well. Everything is very smooth. This throwout bearing may have been going out for longer than I had thought.
I had to skip an evening, but we were released from work a couple hours early, so I have had time to get a bite to eat (skipped lunch today), get home, change clothes, finishe assembling the trike, test ride and adjust the clutch, all by about the time I would normally be getting home.
The new clutch works very well. Everything is very smooth. This throwout bearing may have been going out for longer than I had thought.
Tuesday, November 23, 2010
Sponge Bob Clutch Problem Resolved
I used my fancy new tool and removed the remaining shock absorber. It worked perfectly. :)
I pulled the engine and saw that the throwout bearing had not, as I had suspected, jumped off the fork. Instead, I saw that the collar on the pressure plate had been ground off.
Some pieces of metal were recoverable, but mostly, there was a lot of shiny dust and a funky "burned barbecue" smell. The inside of the bell housing was coated with oil. My first thought was that the seal on either the engine or the transaxle was leaking.
None of the oil looks fresh, however. I recall that when the oil cooler event occurred, the top of the engine and transaxle were pretty much drenched in oil and I think that's where it came from.
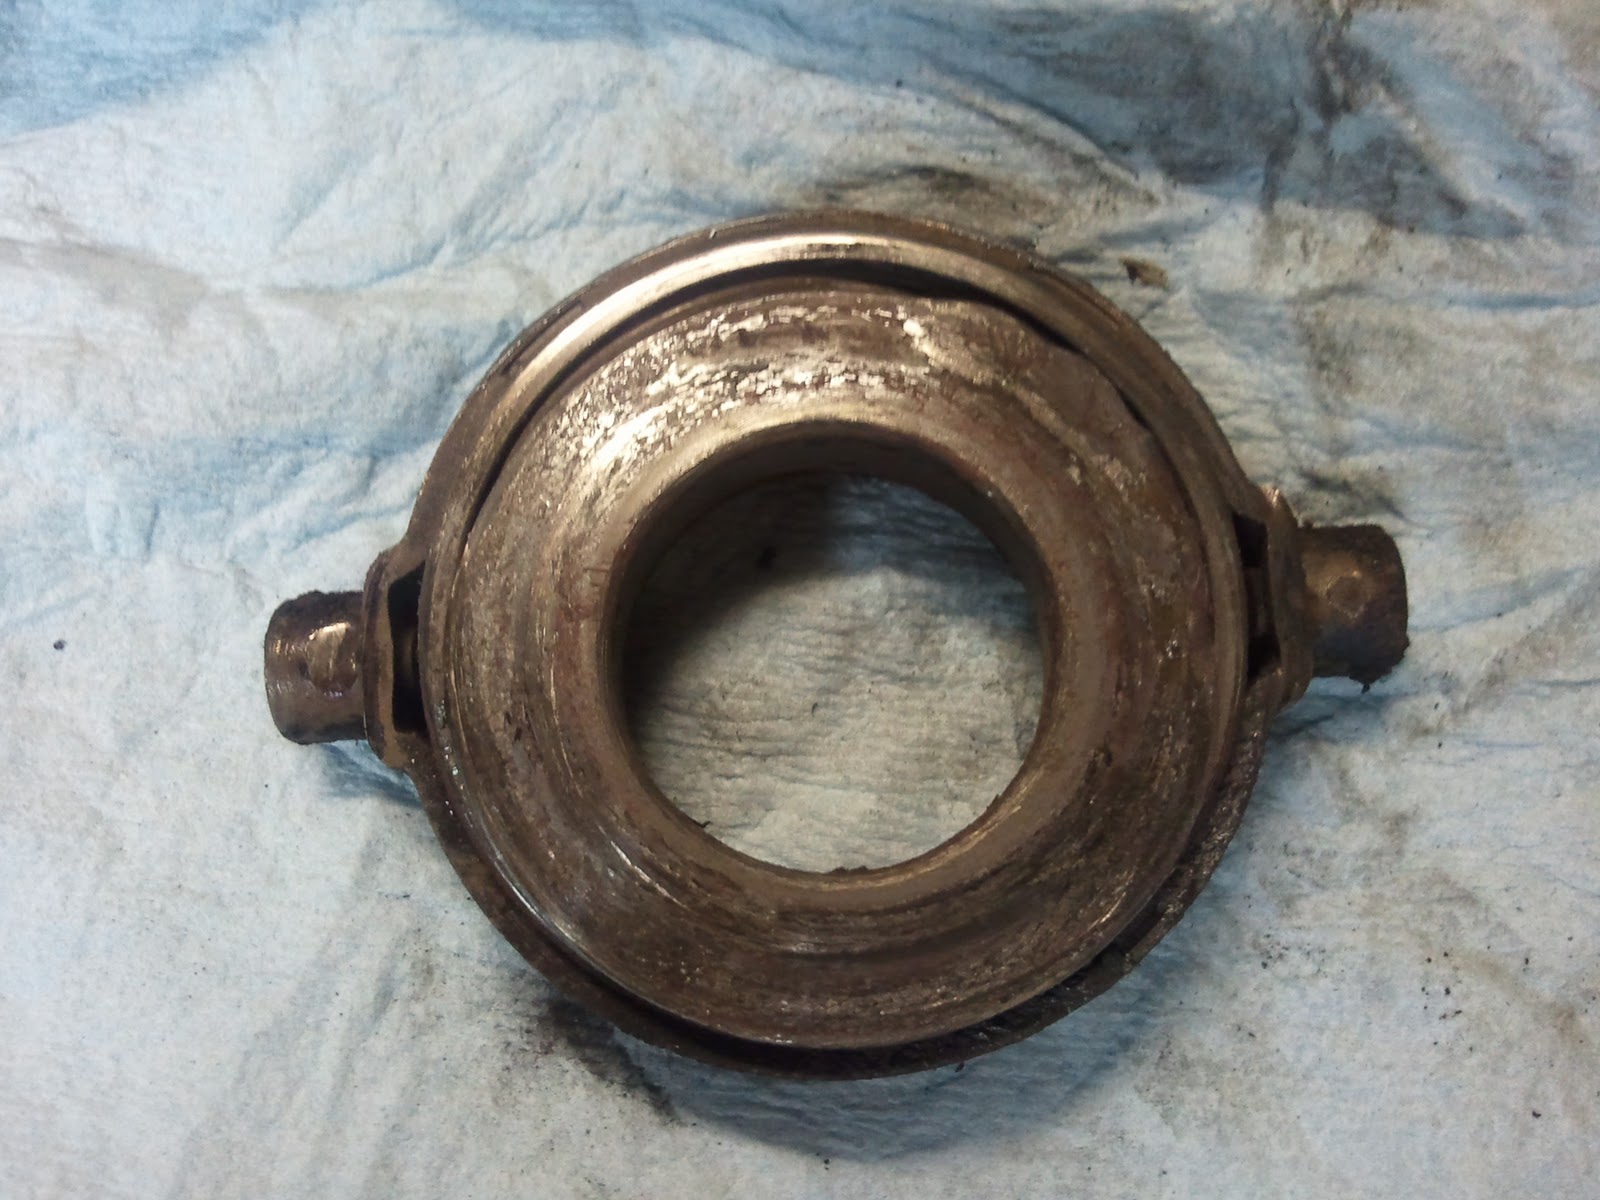
The throwout bearing itself had not jumped the rails, but you could tell that the surface didn't look right.
Turns out that the bearing was not turning and the collar from the pressure plate had friction welded to the bearing race!
You can see the bearing race is completely hidden. For the entertainment value, I will see what forensic data I can gather and report back.
It's no wonder the bearing failed, what with the inner race being off center and the balls scrambled inside the bearing.
I found that AutoZone carries the throwout bearing, for $37. They are about $15-18 at most places. AutoZone isn't usually that high on any given item.
More importantly, while I have a new pressure plate leftover from the other trike, it looked like replacing the disk would be a good idea, what with all that oil. The disk also had a slightly strange wear pattern on it, seeming to wear most in a circle that would describe the center of the friction material. The contact side of the otherwise ruined pressure plate looked fine, but obviously it had to go.
AutoZone has a clutch kit which contains the clutch disk, pressure plate, throwout bearing, pilot bearing and a (redundant) pilot alignment tool. This whole assembly is $102 *and* carries a lifetime warranty. So I got one.
Nothing very magical about the installation from this point forward. I scraped as much of the slightly sticky dust off the flywheel as I could and vacuumed it away. Then I used a bunch of brake cleaner to ensure that the flywheel was clean and oil-free. After the brake cleaner, the pilot bearing needed grease.
Then I put the disk and pressure plate on and snapped a picture of it:
Looks like pretty much every other clutch, huh? :)
It took pretty much a whole can of brake cleaner to get the bell housing clean. I found a few recognizeable bits of metal from the old pressure plate in there. I installed the new throwout bearing. Now that I've done it a few dozen times, I can remove and install the spring clips with minimal bloodletting.
Bolted the engine and transaxle back together and before I continued, I verified that the clutch will disengage. That was a problem with the Dragon trike's clutch and I wanted to make sure the same thing didn't happen here before I finished bolting up everything else and had to pull it out again!
I ran out of time and will need to finish the rest of it tonight.
I pulled the engine and saw that the throwout bearing had not, as I had suspected, jumped off the fork. Instead, I saw that the collar on the pressure plate had been ground off.
Some pieces of metal were recoverable, but mostly, there was a lot of shiny dust and a funky "burned barbecue" smell. The inside of the bell housing was coated with oil. My first thought was that the seal on either the engine or the transaxle was leaking.
None of the oil looks fresh, however. I recall that when the oil cooler event occurred, the top of the engine and transaxle were pretty much drenched in oil and I think that's where it came from.
The throwout bearing itself had not jumped the rails, but you could tell that the surface didn't look right.
Turns out that the bearing was not turning and the collar from the pressure plate had friction welded to the bearing race!
You can see the bearing race is completely hidden. For the entertainment value, I will see what forensic data I can gather and report back.
It's no wonder the bearing failed, what with the inner race being off center and the balls scrambled inside the bearing.
I found that AutoZone carries the throwout bearing, for $37. They are about $15-18 at most places. AutoZone isn't usually that high on any given item.
More importantly, while I have a new pressure plate leftover from the other trike, it looked like replacing the disk would be a good idea, what with all that oil. The disk also had a slightly strange wear pattern on it, seeming to wear most in a circle that would describe the center of the friction material. The contact side of the otherwise ruined pressure plate looked fine, but obviously it had to go.
AutoZone has a clutch kit which contains the clutch disk, pressure plate, throwout bearing, pilot bearing and a (redundant) pilot alignment tool. This whole assembly is $102 *and* carries a lifetime warranty. So I got one.
Nothing very magical about the installation from this point forward. I scraped as much of the slightly sticky dust off the flywheel as I could and vacuumed it away. Then I used a bunch of brake cleaner to ensure that the flywheel was clean and oil-free. After the brake cleaner, the pilot bearing needed grease.
Then I put the disk and pressure plate on and snapped a picture of it:
Looks like pretty much every other clutch, huh? :)
It took pretty much a whole can of brake cleaner to get the bell housing clean. I found a few recognizeable bits of metal from the old pressure plate in there. I installed the new throwout bearing. Now that I've done it a few dozen times, I can remove and install the spring clips with minimal bloodletting.
Bolted the engine and transaxle back together and before I continued, I verified that the clutch will disengage. That was a problem with the Dragon trike's clutch and I wanted to make sure the same thing didn't happen here before I finished bolting up everything else and had to pull it out again!
I ran out of time and will need to finish the rest of it tonight.
Monday, November 22, 2010
Sponge Bob Clutch
Sponge Bob Break
Sadly, this is a pun. Not only does this post represent a break in the current storyline, it is also a lament that Sponge Bob is broken.
I swear, I'm not taking that trike to Arlington anymore. We took it Oklahoma and to the Hill Country twice and all over the metroplex. The clutch broke once in Oklahoma on it's first journey, but regardless of all the other traffic, it has broken down three times in Arlington.
Good or bad, at least I've gotten good enough at riding it without the clutch that at least I wasn't stranded in Arlington. This time.
So, I need to figure out what's wrong this time. I suspect that the throwout bearing has jumped off the rails. There seems to be a delicate balance on exactly where the clutch arm needs to stop. Which is, of course, me saying that I'm sure it's actually my fault, but I still suspect an Arlington connection.
Checking the throwout bearing is a fairly simple affair. Remove four wires, one fuel line and the four nuts holding the engine on and check it out.
To remove the engine, however, I need to remove the baja bumper. To remove the baja bumper, I need to remove the shocks. The new shocks are coilovers, which complicates their removal and installation because they need to be compressed to fit.
They make a tool to compress these sorts of springs. I have search for one locally to no avail and just have never gotten around to ordering one. So I was trying to figure out a way to compress the shocks since I will need to do this occasionally.
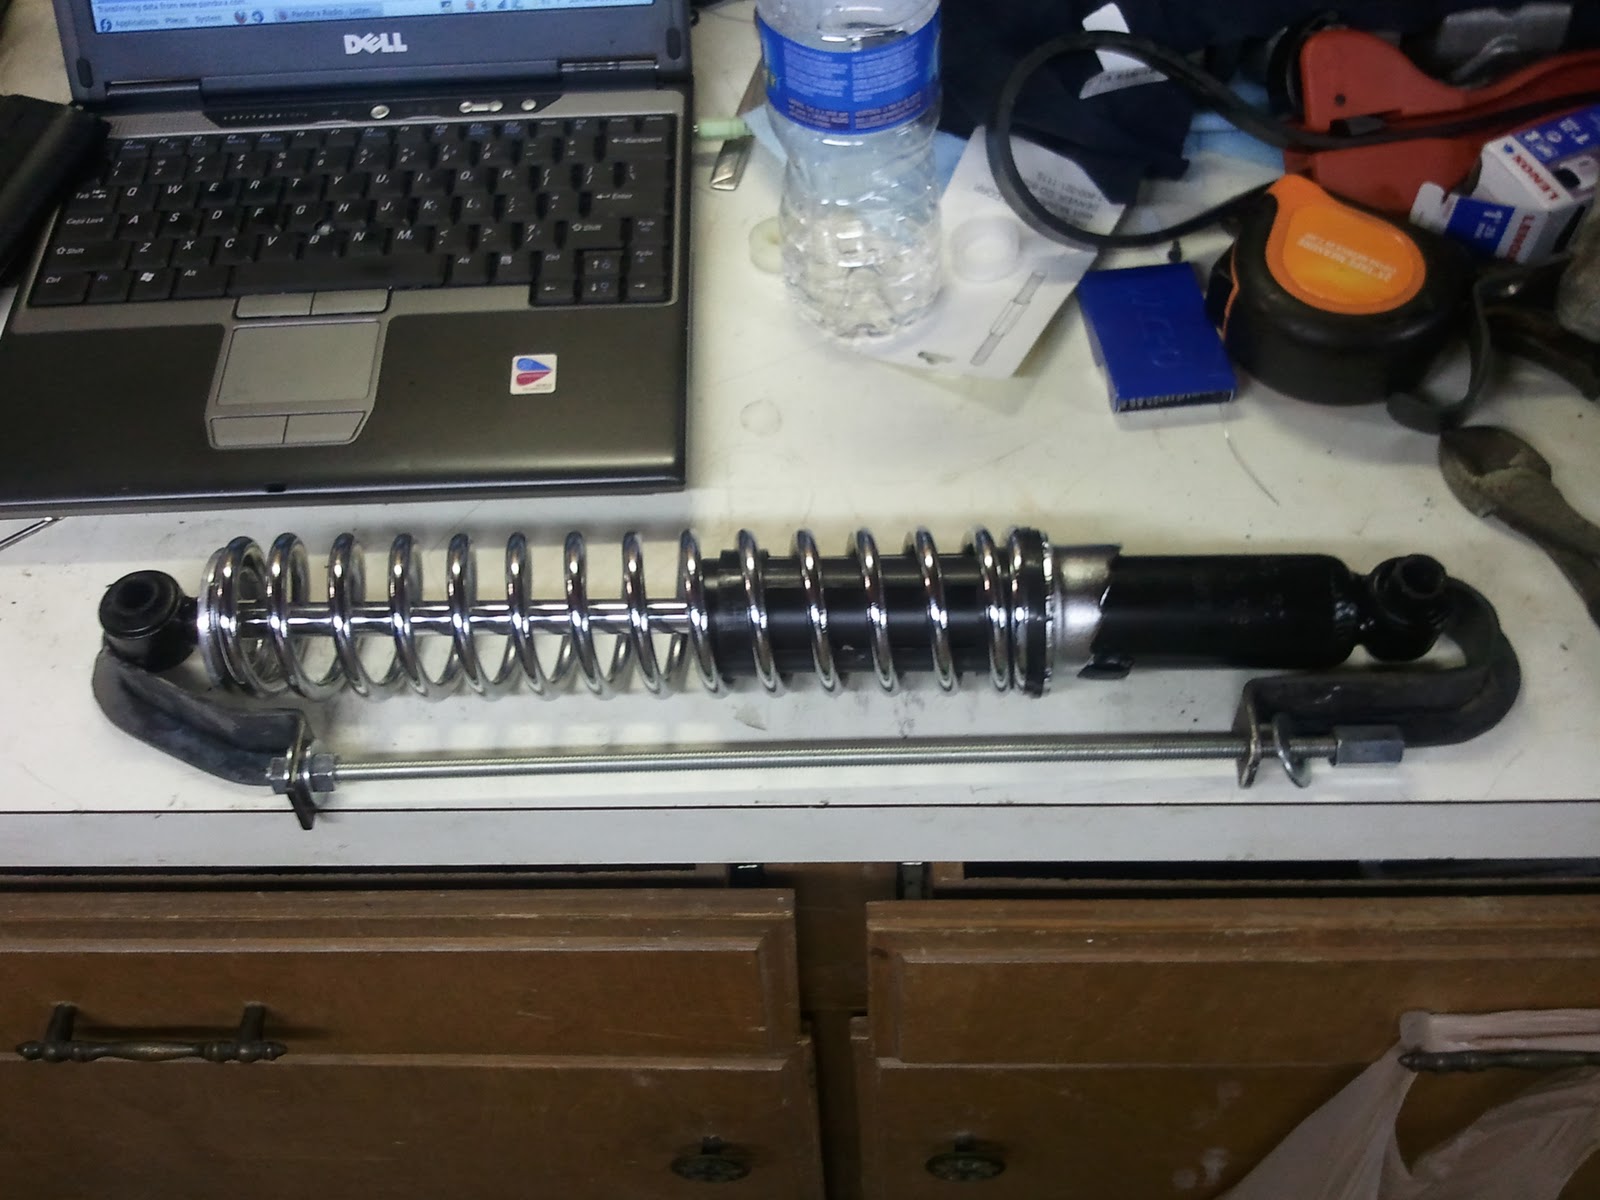
I first tried a ubolt extended with all thread, but there isn't room on both sides of the shock for the all thread. I figured a way to do it with a couple of hand fabricated hooks. It took about 30 minutes to fashion the hooks and try it out to remove one shock. It worked pretty well, but one hook straightened out and failed while the shock was sitting on the bench. I knew the concept was good and just needed stronger hooks, so I made another with braces.
The hook on the left is designed to clear the spring. Were I to remake the hook on the right, I might offset the hole for the all thread so it would be parallel to the body of the shock, but I'm not sure that would really be necessary.
I might also add a brace at the far right and use a longer all thread so the wrenching surface would be easier to reach. That hook is on the bottom of the shock and moving the nut closer to the end would let it be reached more easily from below the trike.
As it stands, it works well enough to install and remove at least the one shock.
Once I was finished with that, decided I was too tired to tear into the trike and cleaned up the shop before things get out of hand. A few days of cutting and grinding makes a mess.
Maybe I wasn't so tired after all because I also *finally* assembled a storage cabinet that I have had for enough months to wonder if it could be counted in years. It's a nice big cabinet, and as expected, it doesn't have enough shelves, but I can fix that.
It looks twisted in the pic, but it isn't. I put a few things that have been sitting on the floor in it, as well as all the power tools that have been in a functional but ugly cabinet that I will be taking down. I think I have a place for the old cabinet. Where it is will go my band saw and drill press, which have also been sitting around on the floor a while.
I swear, I'm not taking that trike to Arlington anymore. We took it Oklahoma and to the Hill Country twice and all over the metroplex. The clutch broke once in Oklahoma on it's first journey, but regardless of all the other traffic, it has broken down three times in Arlington.
Good or bad, at least I've gotten good enough at riding it without the clutch that at least I wasn't stranded in Arlington. This time.
So, I need to figure out what's wrong this time. I suspect that the throwout bearing has jumped off the rails. There seems to be a delicate balance on exactly where the clutch arm needs to stop. Which is, of course, me saying that I'm sure it's actually my fault, but I still suspect an Arlington connection.
Checking the throwout bearing is a fairly simple affair. Remove four wires, one fuel line and the four nuts holding the engine on and check it out.
To remove the engine, however, I need to remove the baja bumper. To remove the baja bumper, I need to remove the shocks. The new shocks are coilovers, which complicates their removal and installation because they need to be compressed to fit.
They make a tool to compress these sorts of springs. I have search for one locally to no avail and just have never gotten around to ordering one. So I was trying to figure out a way to compress the shocks since I will need to do this occasionally.
I first tried a ubolt extended with all thread, but there isn't room on both sides of the shock for the all thread. I figured a way to do it with a couple of hand fabricated hooks. It took about 30 minutes to fashion the hooks and try it out to remove one shock. It worked pretty well, but one hook straightened out and failed while the shock was sitting on the bench. I knew the concept was good and just needed stronger hooks, so I made another with braces.
The hook on the left is designed to clear the spring. Were I to remake the hook on the right, I might offset the hole for the all thread so it would be parallel to the body of the shock, but I'm not sure that would really be necessary.
I might also add a brace at the far right and use a longer all thread so the wrenching surface would be easier to reach. That hook is on the bottom of the shock and moving the nut closer to the end would let it be reached more easily from below the trike.
As it stands, it works well enough to install and remove at least the one shock.
Once I was finished with that, decided I was too tired to tear into the trike and cleaned up the shop before things get out of hand. A few days of cutting and grinding makes a mess.
Maybe I wasn't so tired after all because I also *finally* assembled a storage cabinet that I have had for enough months to wonder if it could be counted in years. It's a nice big cabinet, and as expected, it doesn't have enough shelves, but I can fix that.
It looks twisted in the pic, but it isn't. I put a few things that have been sitting on the floor in it, as well as all the power tools that have been in a functional but ugly cabinet that I will be taking down. I think I have a place for the old cabinet. Where it is will go my band saw and drill press, which have also been sitting around on the floor a while.
Friday, November 19, 2010
Footpegs Continued
The #2 tip is enough bigger to get the job done, but I still had a LOT of trouble getting the inside corner of the 3 way intersection properly bonded.
Still, I think it will plenty strong. Nearly 50% of the gusset's entire edge is secured.
I ran a sanding disk over it everywhere I could reach.
Perhaps I can use my little abrasive blaster to further clean the crevices.
Tomorrow, I pick up the ubolts and try it on for size. Assuming it works, on Monday I will drop it off for powder coating (which is preceded by a rather aggressive shot peening by a massive machine called the Wheelabrator, so I'm not sure why I am worried about sanding it) and that will nearly be that.
Picking it up and handling it reminds me of a crossbow....
Still, I think it will plenty strong. Nearly 50% of the gusset's entire edge is secured.
I ran a sanding disk over it everywhere I could reach.
Perhaps I can use my little abrasive blaster to further clean the crevices.
Tomorrow, I pick up the ubolts and try it on for size. Assuming it works, on Monday I will drop it off for powder coating (which is preceded by a rather aggressive shot peening by a massive machine called the Wheelabrator, so I'm not sure why I am worried about sanding it) and that will nearly be that.
Picking it up and handling it reminds me of a crossbow....
Subscribe to:
Posts (Atom)