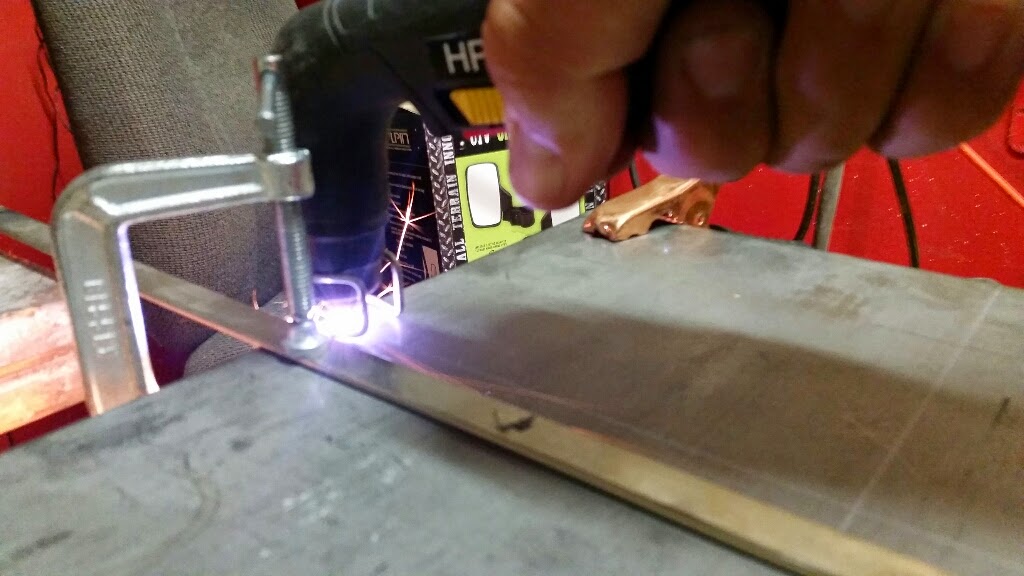
Last night, I rough cut the rest of the fuel tank panels.
I was able to clamp on a straight edge and follow it for all cuts.
I haven't perfected the offset yet, so I do have some parts that might need a little more trimming.
A simple straight edge, clamped at an offset from the cut line, works pretty well. The wire standoff guide is far from ideal, though.
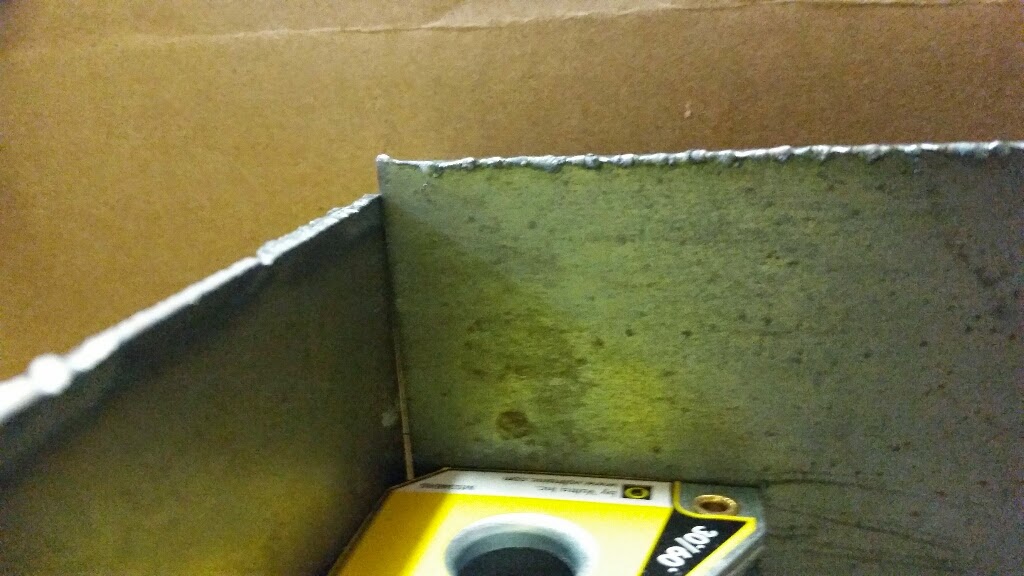
In any case, I have a stack of panels, ready to trim, clean and assemble!
Thursday, August 14, 2014
Wednesday, August 13, 2014
The Long Awaited Parting
I have, after MUCH delay, began the construction of the replacement fuel tank for Puff, the dragon trike.
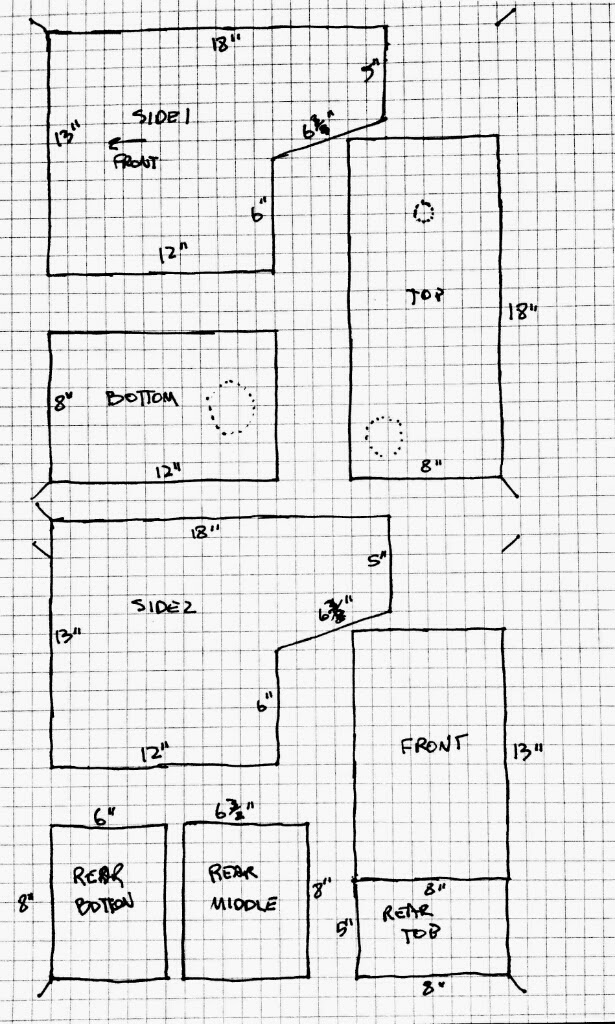
Here is the basic plan:
The layout is intended to use as many of the factory sheared edges as possible to help keep the parts as square as possible. I would love to have used one 5' long 8" wide strip for the top, bottom and ends, but I don't have a bending brake. I have found many inexpensive brakes, but they tend to be limited to 20ga and smaller material. There is a substantial jump in the cost of tools that can bend 16ga. So, instead of about 11 feet of seams to weld, it will be more like 25 feet.
The dotted circles on the top piece are for the filler neck and fuel level sender.
There is a dotted circle shown on the bottom piece is intended for the in-tank fuel pump I am currently using, but I don't like it hanging out of the bottom of a tank that is already pretty low to the ground, so I am considering plumbing this tank for an external fuel pump. On the other hand, I already *have* the in tank pump, it has a pressure regulator attached and it needs no return line plumbing.
Not shown in this drawing are a couple of baffles to be added to the bottom to minimize sloshing. These will simply be panels tacked to the sides and bottom of the tank, arranged and/or cut to allow free flow of fuel, but not totally free movement.
Monday, August 11, 2014
Long Time!
It's been a long time since I've updated here... Been busy with other stuff and even that has been slow to update lately :)
Trike stuff has been slow, but not static. Since that last update, Spongebob has had the most blogable action.
Though it was not immediately apparent, while being stored for a while, Spongebob leaked a lot of oil. Turns out that what really happened is that the fuel tank cap did not vent correctly and the pressure was able to overcome the float valve and flood the engine with fuel, which eventually seeped to the crankcase and overflowed it. This became very apparent when I was rolling the trike out to attend a monthly BTW meeting. It first acted like the battery was nearly dead, which was not unexpected. Unknown at the time, the engine was actually in hydrolock and not able to turn over. Keeping at it, I cleared the cylinders, but when it started up, oil poured everywhere.
Though it would be a few days before I got to it, I drained the crankcase and refilled with fresh oil and started it up. It still leaked oil at too high of a rate to operate, so I presumed the event had damaged the front seal and I again left it for a while.
When our vagabond friend John came to visit, he got interested in effecting the repair, as taking Spongebob for the occasional spin is one of his favorite activities, so I let him tear into it. He replaced the front seal and did a lot of cleanup on the engine, as well as a number of other related work. Even after that, if the cap was properly closed, it would do the same thing. For the time being, we were leaving the cap loose unless the trike was underway somewhere. We also installed an inline fuel shutoff valve. That that seemed to have prevent it from happening at all, though it's not really in a convenient spot to operate all the time.
I opened the cap and reduced the spring tension on the vent mechanism by trimming out a couple of coils. My redneck test of sticking it on my mouth and blowing indicated that I had reduced the required pressure by about half, but in use, it still fails to vent before it blows past the float valve.
I then fashioned a tank vent by putting a fitting in the filler neck and attaching a length of hose to it. There is no pressure build up, so no overcoming the float valve!
Trike stuff has been slow, but not static. Since that last update, Spongebob has had the most blogable action.
Though it was not immediately apparent, while being stored for a while, Spongebob leaked a lot of oil. Turns out that what really happened is that the fuel tank cap did not vent correctly and the pressure was able to overcome the float valve and flood the engine with fuel, which eventually seeped to the crankcase and overflowed it. This became very apparent when I was rolling the trike out to attend a monthly BTW meeting. It first acted like the battery was nearly dead, which was not unexpected. Unknown at the time, the engine was actually in hydrolock and not able to turn over. Keeping at it, I cleared the cylinders, but when it started up, oil poured everywhere.
Though it would be a few days before I got to it, I drained the crankcase and refilled with fresh oil and started it up. It still leaked oil at too high of a rate to operate, so I presumed the event had damaged the front seal and I again left it for a while.
When our vagabond friend John came to visit, he got interested in effecting the repair, as taking Spongebob for the occasional spin is one of his favorite activities, so I let him tear into it. He replaced the front seal and did a lot of cleanup on the engine, as well as a number of other related work. Even after that, if the cap was properly closed, it would do the same thing. For the time being, we were leaving the cap loose unless the trike was underway somewhere. We also installed an inline fuel shutoff valve. That that seemed to have prevent it from happening at all, though it's not really in a convenient spot to operate all the time.
I opened the cap and reduced the spring tension on the vent mechanism by trimming out a couple of coils. My redneck test of sticking it on my mouth and blowing indicated that I had reduced the required pressure by about half, but in use, it still fails to vent before it blows past the float valve.
I then fashioned a tank vent by putting a fitting in the filler neck and attaching a length of hose to it. There is no pressure build up, so no overcoming the float valve!
In proper followup, I probably need to replace the float valve. Chances are that it may have been damaged by the overpressure situation.
Then comes the day this weekend when we are again wanting to take the trikes to a BTW meeting. I had tried to start the trike the previous weekend when were were attending a birthday party. It would crank and crank, but not start. We were short on time that day, so I didn't do any other troubleshooting. This time, however, I had a little more time and put some more time into it.
I found a badly cracked rubber vacuum cap on one of the carburetor vents. In my experience, that wont usually prevent it from starting, though it can make it run very badly. It took a while to find the package of caps I had, but of course that didn't make any difference. It seemed to be getting spark, but I didn't smell fuel. I started tracing that down and found, surprise, the inline valve was off. Opened it, turned the key on and heard the tone of fuel pump change as it pressurized the system. Hit the start button and he lept immediately to life.
I pulled both trikes over to the house and hosed off the dust; not really a good wash, but roadworthy. We headed in to Fort Worth for the meeting.
As we got close to our destination, the other trike began running rougher and rougher and eventually stopped... in the left turn lane on the access road where we needed to cross over and u-turn to get to the meeting. Try as we may, it would not start. We waited for a clearing in the traffic and I pushed Gabby into a sharp right turn. The road had a bit of a hill on it and she tried bump starting it on the hill and, surprisingly, it started! We were going to try to see if we could make it to the meeting before it died again, but it didn't get far at all. After another try or two at bump starting it again, we gave up and parked it. Gabby climbed aboard and we headed to the meeting, arriving late, but arriving.
After the meeting, a crew of folks went with us to troubleshoot and it was determined that the alternator belt was loose, very loose. Loose enough to prevent it from charging, which apparently let the battery run dead enough to not provide a reliable spark, which seems to be what stranded us. Also why a bump start worked for a bit, with started not pulling the voltage down.
After establishing that there were no shims left to remove in order to tighten the belt, one of the crew produced a spare belt from his parts stock and we installed it. Well, I say we, but nobody made room for me to help, but I let them do it for me. :)
By then, the battery had chemically recovered sufficiently enough to start and the now tight enough belt was actually charging. Long story short, the trike was reliable for the rest of the day and even had noticeably brighter lights. Amazing what you miss if you don't look for it.
Friday, May 31, 2013
The Awl Bid'ness
We had the Memorial Day BTW shindig to prepare for, so I changed the oil in both of the currently serviceable trikes and added (re-added) the the long since bypassed oil cooler on Sponge Bob. The new oil cooler is an Empi 9291 shrink wrapped kit that includes an adapter to connect to the block and a remote oil filter adapter. There is an engine adapter already in place from the previous cooler and time and hose constraints have delayed the installation of oil filter at this time.
This cooler is a 8 pass unit, larger than the old one. Consequently, I needed to find another place to put it. There was room under the deck on the right side of the engine.
The bracket is bolted on one side to the box. I made a simple bracket for the other end.
Then I pretty much split the hose that came with the kit and plumbed it into the engine.
It didn't seem to take a lot of extra oil, but I'm guessing it's probably about 1/2 quart for the hose and cooler.
Next, I need to add some disconnect fittings into the lines so that removing the engine will not require either pulling the hoses or unbolting the cooler. Pegasus Auto Racing has some nice AN fittings for a reasonable price. I got four female hose ends and two male couplers. Not only can the cooler be removed, this configuration makes it fairly easy to bypass the oil cooler if the need arises again.
In less happy news, the oil leak from the rearish of the engine was not stopped by the replumbing, however having freshened the oil, it's now a bit more obvious that it may be transaxle oil rather than engine oil. The oil on the ground is black, but the oil on the dipstick is honey colored, even after 400 mile round trip. While this occurred to me earlier this week, I have not yet verified the theory. It should be pretty simple to check; transaxle oil smells horrible.
This cooler is a 8 pass unit, larger than the old one. Consequently, I needed to find another place to put it. There was room under the deck on the right side of the engine.
The bracket is bolted on one side to the box. I made a simple bracket for the other end.
Then I pretty much split the hose that came with the kit and plumbed it into the engine.
It didn't seem to take a lot of extra oil, but I'm guessing it's probably about 1/2 quart for the hose and cooler.
Next, I need to add some disconnect fittings into the lines so that removing the engine will not require either pulling the hoses or unbolting the cooler. Pegasus Auto Racing has some nice AN fittings for a reasonable price. I got four female hose ends and two male couplers. Not only can the cooler be removed, this configuration makes it fairly easy to bypass the oil cooler if the need arises again.
In less happy news, the oil leak from the rearish of the engine was not stopped by the replumbing, however having freshened the oil, it's now a bit more obvious that it may be transaxle oil rather than engine oil. The oil on the ground is black, but the oil on the dipstick is honey colored, even after 400 mile round trip. While this occurred to me earlier this week, I have not yet verified the theory. It should be pretty simple to check; transaxle oil smells horrible.
Tuesday, May 14, 2013
Uddn Uddn
The engine in Kermit is beginning to show the signs of needing a rebuild, so (long story short; savor that while you can) we found a likely candidate on Craigslist. I got up (relatively) early on Saturday and drove the hour and a half to Lucas, TX, where I found Bob to be a very friendly and interesting guy. We could have gabbed for another hour or so, but I wanted to get back home and see if I could get this thing done in time to ride to the BTW chapter meeting on Sunday.
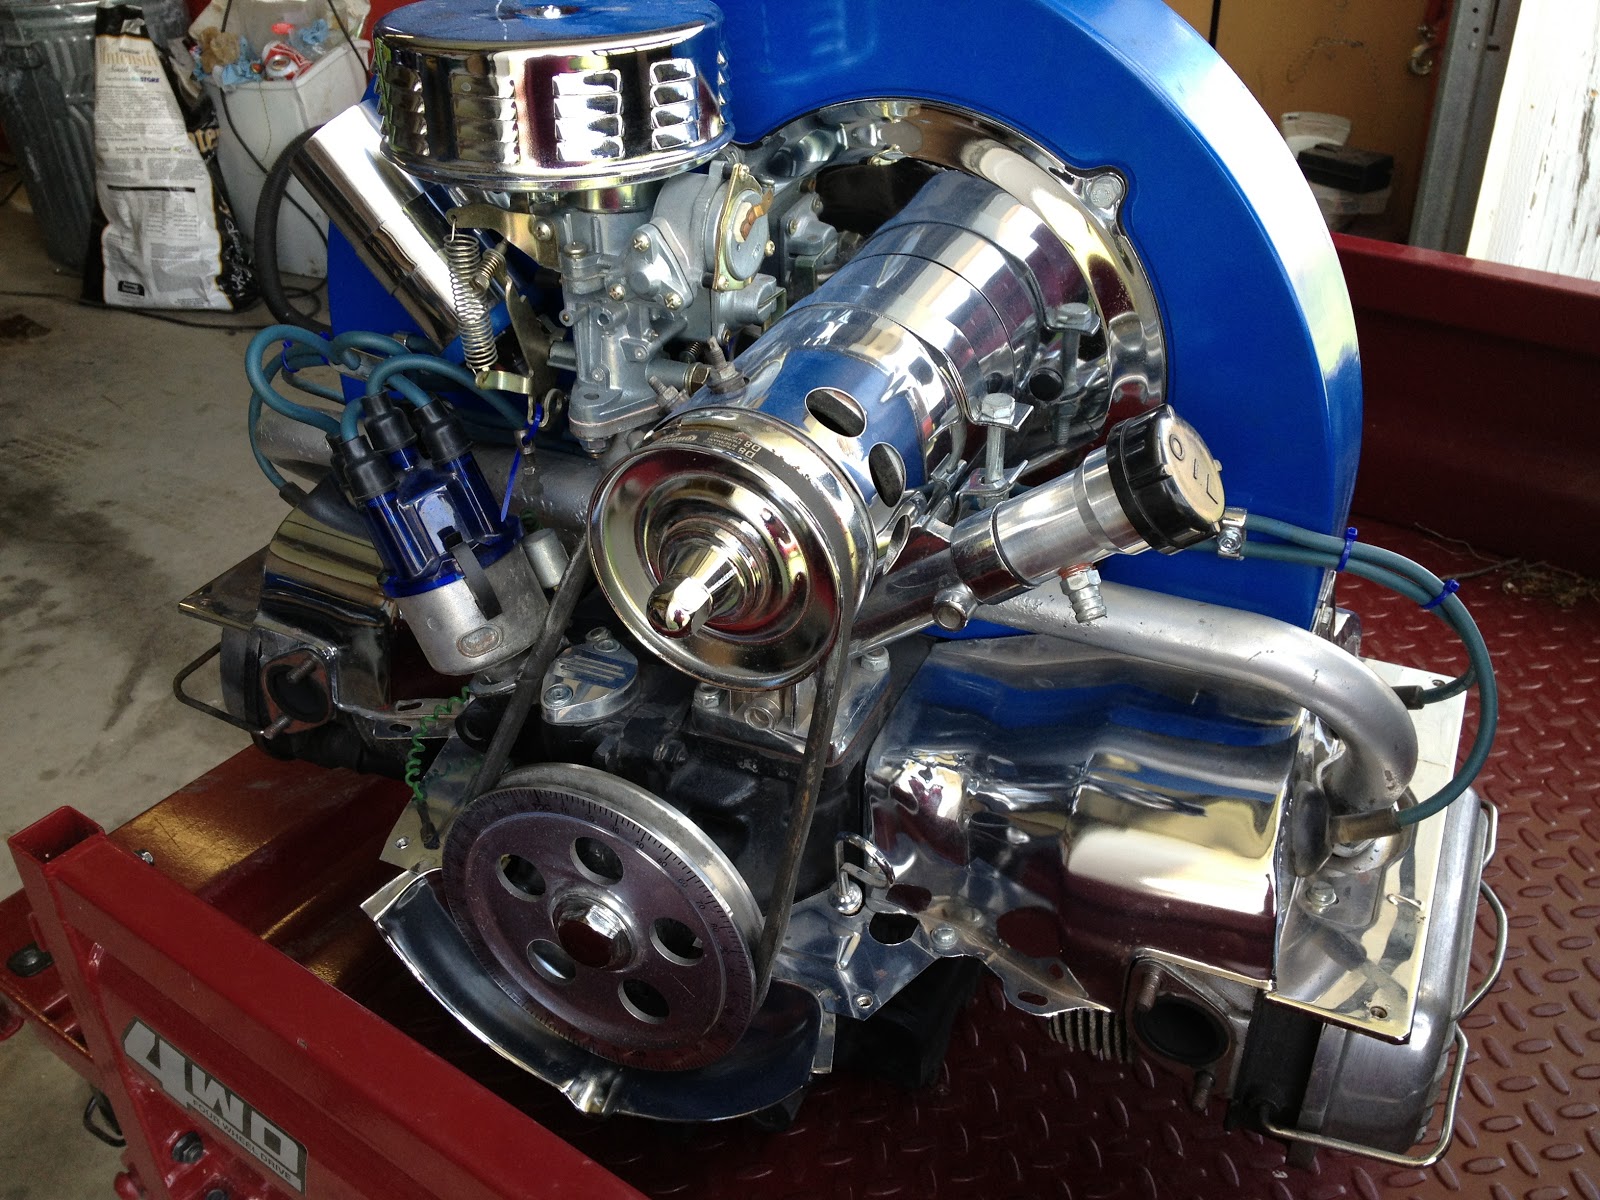
I got started about 1PM. This is Kermit's old engine before the operation began.
Removal of the old engine was a breeze, especially having done it a few times by now. On the other hand, the new engine had a generator and since Kermit isn't wired for a generator, I elected to swap them out. I remember now how involved it actually is to do that. It involved so major a disassembling that I should have changed the carburetor while I was at it.
The carb on the new engine is literally brand new. It, like the oil filler neck, had obviously never had any fluid through them. I was mildly concerned because the carburetor is a 30PICT-1, originally intended for 1300cc engines. I was going to suffer greatly if this turned out to be a 1300, but I was confident that the AE- serial number on the case, the doghouse oil cooler and the 200mm flywheel all pointed to it more likely being a 1600.
The new engine had a threaded insert where the old one had an open hole, and the bolt I had was a D-bolt intended for a starter and wasn't really one for torquing down. It would probably have sufficed, but this is Mama's trike and I don't want it to come loose just because I was too lazy to go buy the right bolt. Of course, where we live, that's a 45 minute round trip, especially if the first place doesn't have it and Blue Bell is on sale.
The clutch was moved over with a minimum of fuss, but I did not have the handy dandy alignment tool, so I eyeballed it. That turns out to have cost me more time that it would have taken to drive into Fort Worth and get my clutch tool from the old house. Unfortunately, it didn't occur to me that it could be that until I had exhausted every other explanation as to why I just couldn't get it to go that last inch. It was in far enough for the splines to engage, but apparently that wasn't enough. I pulled the engine back out (not that it was actually attached), carefully loosened the clutch bolts until I could just scoot the disc and used my socket handle as the closest tool to the proper one. Tightened everything back down and stabbed the engine first try.
The Mr Gasket fuel pump was very easy to put back where it came from on the old engine, but the coil used to be mounted on the back where the doghouse oil cooler is now. I didn't like the stock location, though I can't really define why. So, I put it on the edge of the fan housing, just above the fuel pump. this is kinda ugly from a wiring standpoint, but it's the best compromise without redoing all the wire in the area and the goal here is to have it ready to ride on Sunday.
I had no further trauma and was able to crank the engine and start it, first try, around 11PM.
Now, it didn't run very nicely, which turned out to be because plug wires 2 & 3 were swapped on the distributor cap, but once that was corrected, I was able to get a decent idle and rev out of it. I don't fit this trike; it is carefully adjusted to fit Gabby (and I guess anyone near her perfect dimensions, which rules me out for I am a couple feet too tall), so a test ride would have to wait for her in the morning. I called it a night around 1AM. 12 hour job.
Sunday morning, Gabby took it for a ride, and armed with the knowledge that the carburetor was probably too small and the centrifugal advance distributor was probably not going to act like the old engine, she a little reluctantly agreed to try taking it to town for the meeting. I finished putting the rest of it together, bumper, air filter, etc and we got ready for the meeting.
It generally ran ok, but developed a tendancy to die at stoplights. Trooper that she is, she tolerated it for nearly 200 miles of round trip riding. We went to the east side of Ft Worth for the BTW meeting, then to Bridgeport to find that our Mother's Day dinner destination closed at 3PM. We went to Sweetie Pie's Ribeyes in Decatur and had steaks and that horrible apple pie that is so bad that they only serve it a few times each year. We took a walk around the square, enjoying the sights. We went from there to Tractor Supply, cause ya just have to, and on home. It was a long day.
The performance of the new engine was, generally, good, maybe a little lackluster, but not without expecting it to be. So, when I got home tonight, I swapped out the 34PICT-3 carburetor and vacuum advance distributor from Kermit's old engine. I had some difficulty getting it to idle really smoothly without setting the idle advance to about 20 BTDC. Full advance wanted to go too far, so I had to back it off a little to about 15 degrees to keep maximum advance below 35 degrees. I didn't touch the carburetor adjustments. Now, it has a little bit of a lopey idle, but revs way quicker than the old engine. Bigger cam? Dunno. We'll see what Gabby's new test drive allows. Hopefully, she can do that during the day tomorrow and if she's happy with it, she might ride it in to work.
I got started about 1PM. This is Kermit's old engine before the operation began.
Removal of the old engine was a breeze, especially having done it a few times by now. On the other hand, the new engine had a generator and since Kermit isn't wired for a generator, I elected to swap them out. I remember now how involved it actually is to do that. It involved so major a disassembling that I should have changed the carburetor while I was at it.
The carb on the new engine is literally brand new. It, like the oil filler neck, had obviously never had any fluid through them. I was mildly concerned because the carburetor is a 30PICT-1, originally intended for 1300cc engines. I was going to suffer greatly if this turned out to be a 1300, but I was confident that the AE- serial number on the case, the doghouse oil cooler and the 200mm flywheel all pointed to it more likely being a 1600.
The new engine had a threaded insert where the old one had an open hole, and the bolt I had was a D-bolt intended for a starter and wasn't really one for torquing down. It would probably have sufficed, but this is Mama's trike and I don't want it to come loose just because I was too lazy to go buy the right bolt. Of course, where we live, that's a 45 minute round trip, especially if the first place doesn't have it and Blue Bell is on sale.
The clutch was moved over with a minimum of fuss, but I did not have the handy dandy alignment tool, so I eyeballed it. That turns out to have cost me more time that it would have taken to drive into Fort Worth and get my clutch tool from the old house. Unfortunately, it didn't occur to me that it could be that until I had exhausted every other explanation as to why I just couldn't get it to go that last inch. It was in far enough for the splines to engage, but apparently that wasn't enough. I pulled the engine back out (not that it was actually attached), carefully loosened the clutch bolts until I could just scoot the disc and used my socket handle as the closest tool to the proper one. Tightened everything back down and stabbed the engine first try.
The Mr Gasket fuel pump was very easy to put back where it came from on the old engine, but the coil used to be mounted on the back where the doghouse oil cooler is now. I didn't like the stock location, though I can't really define why. So, I put it on the edge of the fan housing, just above the fuel pump. this is kinda ugly from a wiring standpoint, but it's the best compromise without redoing all the wire in the area and the goal here is to have it ready to ride on Sunday.
I had no further trauma and was able to crank the engine and start it, first try, around 11PM.
Now, it didn't run very nicely, which turned out to be because plug wires 2 & 3 were swapped on the distributor cap, but once that was corrected, I was able to get a decent idle and rev out of it. I don't fit this trike; it is carefully adjusted to fit Gabby (and I guess anyone near her perfect dimensions, which rules me out for I am a couple feet too tall), so a test ride would have to wait for her in the morning. I called it a night around 1AM. 12 hour job.
Sunday morning, Gabby took it for a ride, and armed with the knowledge that the carburetor was probably too small and the centrifugal advance distributor was probably not going to act like the old engine, she a little reluctantly agreed to try taking it to town for the meeting. I finished putting the rest of it together, bumper, air filter, etc and we got ready for the meeting.
It generally ran ok, but developed a tendancy to die at stoplights. Trooper that she is, she tolerated it for nearly 200 miles of round trip riding. We went to the east side of Ft Worth for the BTW meeting, then to Bridgeport to find that our Mother's Day dinner destination closed at 3PM. We went to Sweetie Pie's Ribeyes in Decatur and had steaks and that horrible apple pie that is so bad that they only serve it a few times each year. We took a walk around the square, enjoying the sights. We went from there to Tractor Supply, cause ya just have to, and on home. It was a long day.
The performance of the new engine was, generally, good, maybe a little lackluster, but not without expecting it to be. So, when I got home tonight, I swapped out the 34PICT-3 carburetor and vacuum advance distributor from Kermit's old engine. I had some difficulty getting it to idle really smoothly without setting the idle advance to about 20 BTDC. Full advance wanted to go too far, so I had to back it off a little to about 15 degrees to keep maximum advance below 35 degrees. I didn't touch the carburetor adjustments. Now, it has a little bit of a lopey idle, but revs way quicker than the old engine. Bigger cam? Dunno. We'll see what Gabby's new test drive allows. Hopefully, she can do that during the day tomorrow and if she's happy with it, she might ride it in to work.
Monday, April 22, 2013
Stuff begins with stuff....
I picked up a stack of 24" squares of 16ga mild steel today. Because of the way they cut and order stuff, 24" squares must be ordered in lots of 8. I know that the tank for Puff will take two squares and all the other stuff I envision will take more and more, so I thought 16 would be a good order that will last a while.
Bit O' Metal Trivia... 16 sheets of 2'x2' 16ga weighs 160 pounds, pretty much...
A New Seat for Kermit
Before I get on with the seat, I have some other update duties to perform.
Kermit had started stalling at most stops, especially in such conditions as a freeway exit or getting caught by a light in a long straightaway. He would always start right back up and and appear to return to normal without issue.
I suspected either of two things, idle circuit adjustment or the throttle cable arrangement, and really, I figured it would be a combination of the two.
Well, spent a good half day dinking with them both to no avail. I found that even sitting in the shop, I was able to duplicate the issue... If I held the engine at 3000 rpm or so, it would die when I closed the throttle. I also noticed that it had a little bit of a miss during that rev.
Then I finally figured it out, having until then ignored the very thing I had installed specifically to catch this kind of problem! The inline fuel pressure gauge was showing 1 PSI. I shut the engine off and was able to squeeze the hose and get the indicator to swing full scale, so it wasn't a bad gauge. Started again and watched the gauge. When running at 3000 rpm, pressure dropped even lower, then about the time the engine would die, the pressure would come back up to 1 PSI. The entire circuit from tank to carburetor is less than three feet as the hose flies.
Long story short (too late), it was the fuel pump. Makes sense... could provide good enough volume to run, though a little lean at higher rpm, then when you come off the throttle, it dies because the idle circuit picks up from the top of fuel bowl. By the time you can restart it, the pump has caught up and filled the bowl. Rinse. Repeat.
So, dashed down to O'Reilly in Decatur (about a 30 minute round trip) and got another fuel pump and a new filter. All hooked up, 5 PSI, can't kill it now.
That day, we went on a ride just short of 150 miles and it didn't (unexpectedly) die once.
So, fast forward a week and I have a new (new to me, anyhow) Hobart AirForce 250ci plasma cutter to play with. Wanted a plasma cutter forever and finally had both the wherewithall to drop a few bucks on one *and* a decent price for a used one on Craigslist. Actually, it's so barely used, it may as well be new.
It can cut.
I chipped the dross off, but this is how it does it.
One of my upcoming projects, and honestly one of the reasons I wanted the plasma torch now, is a replacement fuel tank for the purple trike. That will be made of 16ga mild steel.
In any case, today's project was replacing the seat on Kermit. The old seat came from the basement at American Motorcycle Trading Company in Arlington. It appears to have been a take-off from a modern Indian motorcycle. Decent enough seat, though a trike puts more weight on your tailbone than a motorcycle typically does, so said tailbone can really tell when you've been on a long ride.
After looking at a *LOT* of seats online, mostly boat and tractor seats, we decided to try a particular tractor seat from Northern Tool, which also happened to be on sale for $70.
I knew that it would involve building a bracket of some sort to mount pretty much any seat, so after some test fitting and test sitting (by Gabby; I don't fit on Kermit), I had an idea that 2" square tubing would work pretty well.
There was no easily accesible square tubing to be had on Saturday, but I did get some 2" 90 degree angle from Lowes. Using my schmancy new plasma torch, I learned how not to cut a straight line, then refined the technique until I *could* cut a straight line and zeroed in on a plan to give 2" square tubing in the place I wanted it most, at the ends, by welding a short piece of angle to the span thusly:
The overal bracket is basically U-shaped, with the square "tube" ends holding the back of the seat suspended on a body crossmember and the front sitting on an existing pedestal that I would otherwise just as soon cut out.
I also got to cut out a reduntant piece of metal right where the left rear seat bracket needed to go. I used my welding apron as a blanket to protect wiring and fuel lines from the easily 3-4 second cutting action. This thing rocks. Anyway...
Painted up and bolted in, ready for a seat
I managed to *not* get a pic of the finished seat, but here it is in plywood test garb.
After the seat was tested by Mike Easter, I had Gabby check it out, short of a ride since the trike wasn't back together yet. She had some errands to run, so while she was out, I also wired up to long installed and never connected oil pressure gauge and tachometer. The oil pressure gauge involved replacing the oil pressure switch with an analog sender and a bit of wiring. The oil pressure switch had a wire going up front to the wiring center, but it was not connected. I needed only extend it a foot or so the back of the gauge and wire up a ground for the sender.
The tachometer took a little more because I had to run a wire for it, pushing and threading the wire through the existing loom. Once connected to the breaker point side of the ignition coil, I started the engine up. The oil pressure gauge worked perfectly, but the tach showed double the expected RPM. There is a switch on the back of the tach, a three position switch to choose whether the connected engine is 4, 6 or 8 cylinders, in that order. I think it's probably just labeled wrong because I had to put it in the 8 cylinder position to read sanely on this four.
With those now working, I loosened the bands on the fuel tank and turned it slightly to clear interference it developed with the filler cap and decorative lid.
The trim boards on either side of the seat needed cutting to fit around the new seat bracket, but otherwise, it went back together like a charm.
We took about a forty mile meandering ride through the countryside and so far the seat seems to be helping a lot!
Kermit had started stalling at most stops, especially in such conditions as a freeway exit or getting caught by a light in a long straightaway. He would always start right back up and and appear to return to normal without issue.
I suspected either of two things, idle circuit adjustment or the throttle cable arrangement, and really, I figured it would be a combination of the two.
Well, spent a good half day dinking with them both to no avail. I found that even sitting in the shop, I was able to duplicate the issue... If I held the engine at 3000 rpm or so, it would die when I closed the throttle. I also noticed that it had a little bit of a miss during that rev.
Then I finally figured it out, having until then ignored the very thing I had installed specifically to catch this kind of problem! The inline fuel pressure gauge was showing 1 PSI. I shut the engine off and was able to squeeze the hose and get the indicator to swing full scale, so it wasn't a bad gauge. Started again and watched the gauge. When running at 3000 rpm, pressure dropped even lower, then about the time the engine would die, the pressure would come back up to 1 PSI. The entire circuit from tank to carburetor is less than three feet as the hose flies.
Long story short (too late), it was the fuel pump. Makes sense... could provide good enough volume to run, though a little lean at higher rpm, then when you come off the throttle, it dies because the idle circuit picks up from the top of fuel bowl. By the time you can restart it, the pump has caught up and filled the bowl. Rinse. Repeat.
So, dashed down to O'Reilly in Decatur (about a 30 minute round trip) and got another fuel pump and a new filter. All hooked up, 5 PSI, can't kill it now.
That day, we went on a ride just short of 150 miles and it didn't (unexpectedly) die once.
So, fast forward a week and I have a new (new to me, anyhow) Hobart AirForce 250ci plasma cutter to play with. Wanted a plasma cutter forever and finally had both the wherewithall to drop a few bucks on one *and* a decent price for a used one on Craigslist. Actually, it's so barely used, it may as well be new.
It can cut.
I chipped the dross off, but this is how it does it.
One of my upcoming projects, and honestly one of the reasons I wanted the plasma torch now, is a replacement fuel tank for the purple trike. That will be made of 16ga mild steel.
In any case, today's project was replacing the seat on Kermit. The old seat came from the basement at American Motorcycle Trading Company in Arlington. It appears to have been a take-off from a modern Indian motorcycle. Decent enough seat, though a trike puts more weight on your tailbone than a motorcycle typically does, so said tailbone can really tell when you've been on a long ride.
After looking at a *LOT* of seats online, mostly boat and tractor seats, we decided to try a particular tractor seat from Northern Tool, which also happened to be on sale for $70.
I knew that it would involve building a bracket of some sort to mount pretty much any seat, so after some test fitting and test sitting (by Gabby; I don't fit on Kermit), I had an idea that 2" square tubing would work pretty well.
There was no easily accesible square tubing to be had on Saturday, but I did get some 2" 90 degree angle from Lowes. Using my schmancy new plasma torch, I learned how not to cut a straight line, then refined the technique until I *could* cut a straight line and zeroed in on a plan to give 2" square tubing in the place I wanted it most, at the ends, by welding a short piece of angle to the span thusly:
The overal bracket is basically U-shaped, with the square "tube" ends holding the back of the seat suspended on a body crossmember and the front sitting on an existing pedestal that I would otherwise just as soon cut out.
I also got to cut out a reduntant piece of metal right where the left rear seat bracket needed to go. I used my welding apron as a blanket to protect wiring and fuel lines from the easily 3-4 second cutting action. This thing rocks. Anyway...
Painted up and bolted in, ready for a seat
I managed to *not* get a pic of the finished seat, but here it is in plywood test garb.
After the seat was tested by Mike Easter, I had Gabby check it out, short of a ride since the trike wasn't back together yet. She had some errands to run, so while she was out, I also wired up to long installed and never connected oil pressure gauge and tachometer. The oil pressure gauge involved replacing the oil pressure switch with an analog sender and a bit of wiring. The oil pressure switch had a wire going up front to the wiring center, but it was not connected. I needed only extend it a foot or so the back of the gauge and wire up a ground for the sender.
The tachometer took a little more because I had to run a wire for it, pushing and threading the wire through the existing loom. Once connected to the breaker point side of the ignition coil, I started the engine up. The oil pressure gauge worked perfectly, but the tach showed double the expected RPM. There is a switch on the back of the tach, a three position switch to choose whether the connected engine is 4, 6 or 8 cylinders, in that order. I think it's probably just labeled wrong because I had to put it in the 8 cylinder position to read sanely on this four.
With those now working, I loosened the bands on the fuel tank and turned it slightly to clear interference it developed with the filler cap and decorative lid.
The trim boards on either side of the seat needed cutting to fit around the new seat bracket, but otherwise, it went back together like a charm.
We took about a forty mile meandering ride through the countryside and so far the seat seems to be helping a lot!
Subscribe to:
Posts (Atom)